Managing Definitions
Definitions are used to group the same types of skills together where each skill will have the same type of information (dates, ratings, etc.) associated with each item that is recorded. One or more Definitions are grouped together in the broader collection that is a Category (see Configuring Categories).
Permissions Required
To configure Definitions, the logged in user needs to be a member of an authorisation group that has the Definition Editor privilege.
Navigation
To configure Definitions, from the admin menu gear icon in the top right of the web page, navigate to Definitions> Manage:

- Click the cog icon at the top right of the page to open the admin menu ...
- ... then select the Definitions menu ...
- ... then select the Manage menu option. :::
Manage Definitions Page
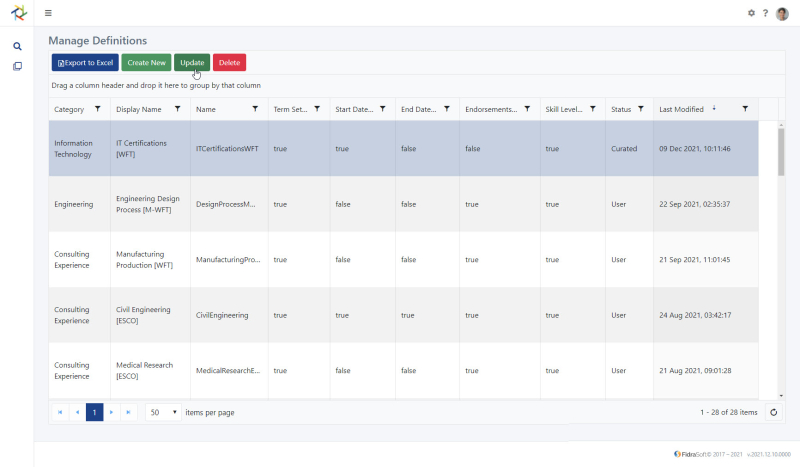
This is a typical TeamFolio admin page that shows a list of all Definitions in a table or admin grid view. There are four actions you can take from this page by clicking the relevant button, sometimes after having selected one or more of the Definitions in the list:

In this example, the administrator has selected the Information Technology definition to Update it. :::
Admin grid view
As with any admin grid in TeamFolio, you can select one or more of the rows in the grid, change how the data is displayed and work with the Definitions using action buttons. For more information on using admin grids, have a look at the Data grid view section in the General UI Guidance article.
Create/Update Definition
The process is almost identical for creating a new Definition or updating an existing Definition.
Definition Admin Pages
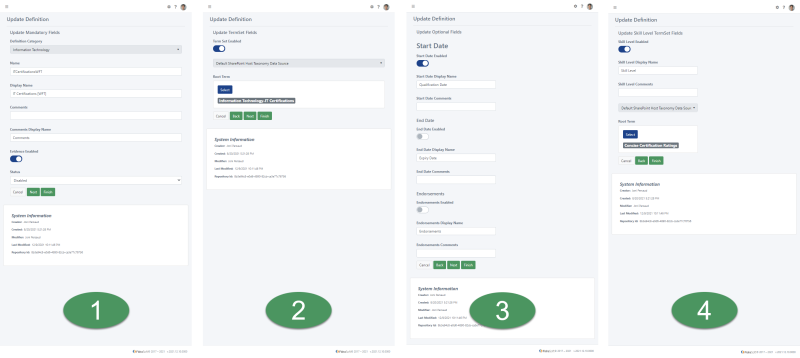
Unlike Categories, which are simple containers that can be configured on a single page, Definitions have a lot more settings that you can configure. These settings are configured in four stages.

- Basic definition information;
- Free text skills or pick list from various taxonomy or other data sources;
- Are dates relevant and should endorsements be enabled;
- Are skill/experience ratings or levels enabled and of so, what data source provides the pick list :::
Each stage has its own admin page which you can click through using the Next and/or Back buttons on each page. It is also now possible to save the configurations you have made on any page. Previously you needed to click through the four pages to finish any configuration.
The following sections look at each of these four configuration stages in more detail.
1 – Configure Mandatory Fields
The first configuration stage is where you define basic information like the name of the Definition, which Category it is part of, enable evidence documents and if you want everyone to be able to see this Definition.
You can click Next to configure other aspects of this Definition and then click Back to come back to this page to finish off any additional information. If you do not click Finish in any of the 4 stages, any information you have entered in any stage will not be saved. Click Next to go to stage 2.
2 – Configure TermSet Fields
Stage 2 is where you specify if this Definition will only contain values from a term set, or if the user will be able to enter free text values as skills.
In most instances, it is best practice to provide people with a pick list of terms from which they can select a value. To do this, make sure the ‘Term Set Enabled’ switch is moved to the right. When this is done, the Select button in the Select Root Term is enabled.
Click the Select button to open up a window that allows you to configure which term is the root term for this Definition.
When a root term is selected, all subordinate or child terms of the root term will be available for a person to add to their profile in this Definition.
3 – Configure Optional Fields
You might want to use Definitions to let users store information about experience or qualifications that have a time period or individual date associated with it. You can set date information her in stage 3 of the configuration. You can also change the text users will see, for example you may change ‘Start Date’ to ‘Qualification Achieved’ or ‘End Date’ to ‘Expiry Date’.
On this page you can also choose if you’d like people to be able to endorse another person for a skill or experience they have added to their own profile in this Definition.
If this is enabled, when a person is viewing another person’s profile, they will see a small ‘thumbs up’ icon in any skills the person whose profile it is has in this Definition. The viewing user will be able to add an endorsement or remove a previous endorsement they have given for any skill in this Definition.
When used in an organisation, the presence or absence of endorsements will contribute to how a person’s profile is ranked in search results or on community pages.
4 – Configure Skill Level TermSet Fields
The final stage for configuring a Definition is where you’ll specify if any skills created under this Definition will have a rating or classification level associated. If this is set to true, you will then need to select an appropriate root term that will provide a pre-defined list of terms that reflect a rating, qualification, duration or classification level.
Clicking Create New will take you to a form where you can enter a name for the new category and choose if you want this new category to be visible to everyone.
Setting ‘Make Visible by Default’ to true will create a Category View Filter for this category with filter parameters that mean the category will be visible to everyone. This View Filter can be modified at any time – see Note that even if you select ‘Make Visible by Default’, a new category will not become visible until it also contains at least one Definition that is also visible.
Definition Status
When a Definition is created, it is automatically give a status of ‘Disabled’. If you go to update an existing Definition, you will see on the first configuration page a Status setting that can be set to Disabled, User, Curated, Locked, External or Mirrored.
Disabled definitions will remove all associated skills from user profiles, templates, search and nexus results. It is important to note that no data is removed when disabling a definition.
User definitions allow users to manage their own skills via their user profile page.
Curated definitions provide enhanced control over how data within the definition can be edited. Only users with elevated permissions can edit content in a curated definition, even if that definition is on their own profile.

Locked definitions ensure it is not possible for any user to change any skill or information related to a skill in this Definition for any user.
External definitions allow data from third party data sources to be interpreted as skills data and then surfaced in user profiles, search and nexus.
Mirrored definitions allow data from third party data sources to be transmitted to TeamFolio where the data is interpreted and stored as skills data within the TeamFolio database. e.g. Learning Management Systems (such as LinkedIn Learning Management or Udemy) may transmit data providing real-time data on progress and completion of training materials and certifications etc within the Learning Management System. This data is subsequently surfaced in user profiles, search and nexus.
Only a member of an authorisation group that has the Definition Editor privilege can change a Definition’s status back to Live. Any existing data is preserved and will still be able to be searched.
Delete a Definition
There are situations where Definitions may need to be deleted. The Definition may have been created in error or the Definition may no longer store useful or allowable information. Whatever the reason, it is possible to delete one or more Definitions from the Manage Definition page.
Select the Definition(s) to be deleted and click Delete. You are prompted to make sure you definitely want to delete the selected Definition(s).
If you confirm the deletion process, all configuration settings and more importantly, all profile data stored within the TeamFolio database against the Definition(s) will be permanently deleted. :::